
Sponsored Link
Keeping your Ubuntu System up to Date
Although you can use synaptic to install your updates, there is a dedicated tool provided by Ubuntu in the name and form of the "Update Manager" (located in System, Administration, Update Manager). It is very simple to use, once you start it it will auto download the list of updates available for your software. and shows them all neatly checked in a list. If your list is a bit old (it's checked each day) you can make Ubuntu check for new updates by hitting "Check" and your list will be brought up to date. If you are curious and want to know a little bit more about the update(s) click "Show Details".

Ubuntu checks for updates daily as mentioned above and notifies you when updates that are important come up. Run update manager by yourself once in a while as well.
Using Add/ Remove to manage software
This is basically a graphical software manager tool. It is in the applications menu under the name of ‘Add/ Remove" even though it is actually an application itself name "gnome-app-install". It allows you to select (or de-select) various packages all neatly arranged for you under different categories. When you launch Add/ Remove you are not prompted for a password; this is only needed when you have chosen your options and hit "Apply Changes".

Along the left side you should see the list of categories which the different applications will fall into. At the top, the "All" category will be selected by default. It lists every package that can be installed. The right side of the window is split in two with the upper section providing the application list and the lower one providing the selected application's details. Just above the application list are the search and filter tools. The default filter will be set to ‘Supported Ubuntu Applications" You can change that if you would like, I would recommend it, especially if you want to try alot more than what the supported apps has to offer.
Installing new software in Add/ Remove is very simple. You find the package and checking it's box. Once you are happy with what you want to install hit apply. You will be asked by a dialog to enter your password so the changes can actually be made. All software currently installed will already be checked, and you can remove whatever you want by un-checking them, then clicking apply.
To find a specific application in the list, type something into the search bar at the top. Remind you that the searches only look in the category you are currently in, so if you are in the "system Tools" category and search gimp nothing will show up. The best place to do your searches is in the "All" category. That way Add/ Remove will scan through all categories making sure you (hopefully) get what you want.
Using Synaptic Package Manager to manage software
The Add/ Remove dialog works just fine for installing most application, but if you want it more hardcore (library installations, reconfigure something...) you will have to use Synaptic. You can run Synaptic by choosing it from System, Administration, Synaptic Package manager.
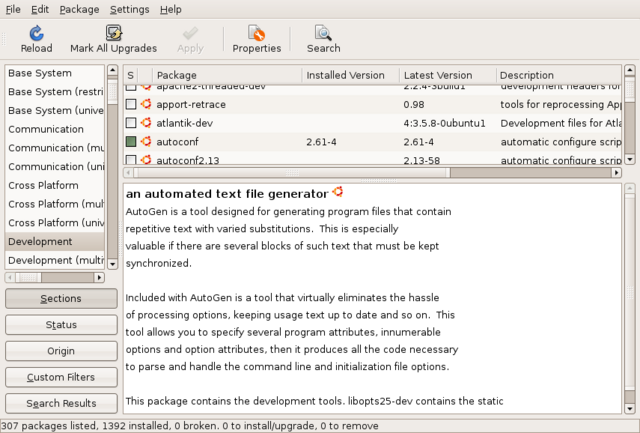
On your first encounter or glance at Synaptic you might think it resembles Add/ Remove a little bit. In fact you are right. The left side has all the categories (but many more!) Along the top right are the selection of all the packages for whatever category you are in and on the bottom right is the selected package's info. In synaptic, to install or remove software, click on one of the boxes (to the left of the actual package's name) and you'll be presented with a menu with a variety of options:
Unmark -- If you've marked this package for installation, upgrade or one of it's many options, this will remove that mark.
Mark for Installation -- Will add the package to the list of ones that will be installed
Mark for Re-Installation -- If you have some software that is currently installed, but it's not working for some reason or another, this will remove it and start from scratch
Mark for Upgrade -- If your software has updates, this wil download and install them
Mark for Removal -- This deletes the selected package from your system, but leaves it configuration file so if you ever decide to re-install the package, you will not have to reconfigure it
Mark for Complete Removal -- This deletes the selected package from your system and also removes the configuration files
After you have made your decisions, you can then hit "Apply" which will then have synaptic download, install, upgrade and remove as you have told it.
Located right under the Categories on the left side, you'll see five buttons: "Sections", "Status", "Origin", "Search Results" and "Custom Filters". These modify the list to the left, Sections is the list view, Status shows you packages that are installed or have upgrades waiting for a package, Origin shows all your sources of packages, search results stores your search results and custom has some grouping that's only for really advanced users.
You can press Ctrl+F or the Search icon at any time to search for a certain package by name. As mentioned already you can return to a search by going to the "Search Results" view and you can just click on the specific search and click on it to search it again.
Well also giving you the method of installing and removing your apps/ software, synaptic can also let you configure servers that provide packages and let you find an install them. Synaptic lets you open up Debian universe and multi-verse.
Ubuntu is based on Debian Distribution which has around 25, 000 packages today (and growing!). Ubuntu only uses a few of those many packages, but makes it easy for you to unlock the many different packages awaiting your discovery. When using synaptic you should see small Ubuntu logos next to all the packages which certifies them as being officially supported. All other "non"-Ubuntu packages you will enable will not have this seal of approval but still be supported by Debian developers.
To enable this world of magic, open synaptic the go to Settings, Repositories. The list will show you all the servers you have configured (or they were default, either way...). All you need to do is check the Universe and Multi-Verse repositories in there and off you go.
Synaptic shows you an annoying message every time telling you the repository lists have changed and you have to reload the list. Click on the reload button on the top to do so. You should now see a whole lot of new packages at your disposal. However, now, only few have the official Ubuntu logo.
Using Command Line
With so many things to install and so many ways to install them it's very easy to adapt to the the many ways. At the soul of every installation method they use the world renowned "Advanced Package Tool". The power of APT is overwhelming. Join us apt users, nothing comes close!
Why is apt so cool? (It has Super Cow Powers!) It was the first to actually handle dependencies in apps/ software. Other distributions of Linux like Red-Hat used RPM files with dependencies. Example: An RPM for say the gimp will require the graphical tool kit (gtk) which the gimp is based on. So If you tried installing the gimp RPM without the gtk RPM it would fail miserably. So you take the gtk RPM and try installing it.... gtk has dependencies on three other things and so on and so on until you can't find a certain RPM for one of the dependencies and you say (censored) that's enough and then walk away.
APT on the other hand is superior to RPM in every way mainly because it is designed to retrieve your dependencies. So if you want Inkscape it will retrieve all the dependencies as well as the package itself ensuring total simplicity. APT also includes installation resuming, which means if for some reason the install doesn't complete it will start where it left off next time.
Using APT
To make sure APT will find packages quickly it uses local cache. Run this:
sudo apt-get update
The apt-get update command tells APT to find updates and download the latest files from it's list of servers it's configured to use. If your lists are old it takes around a minute to do, if not it finishes in a few seconds.
After you've run that command the latest package info will have been downloaded. Now you can instruct APT to auto download any software that's been updated using this command:
sudo apt-get upgrade
If you have more software on your PC there is a higher chance that something will be updated. Each run will tell important info on what is about to happen.
Example: 2 upgraded, 0 newly installed, 0 to remove and 0 not upgraded.
That is all you need to know about what's going to happen right there. Remember, updates will overwrite the existing files replacing them with new ones so there is no real need to worry about how big the update(s) is/ are.
Remember that a simple apt-get upgrade will never remove or add new software, just update files or existing applications. It is safe and will never break things. Sometimes though you will see a variable in the "0 not upgraded" this is because some software must be installed or removed in order for the upgrade to succeed.
In an event as so you will need to use
sudo apt-get dist-upgrade
It allows you to upgrade from an older version of Ubuntu to a newer one (Such as Feisty to Gutsy). This will move around things and remove obsolete items from the system and installing the latest features. This is one of my favorite commands as a new version of Ubuntu is released every 6 months, it allows you to upgrade without discs.
apt-get upgrade and apt-get dist-upgrade are for bringing packages up to date,
sudo apt-get install
Will add new software. example, say I want to install wine; I would run:
sudo apt-get install wine
APT will find the dependencies I need for wine and list the dependencies you don't already have and then ask for your confirmation for installation.
There are sometimes suggested packages, suggested packages don't add any crucial features to an application, but you might need them for certain things.
If you run an APT install on an existing installed package, APT will intercept your command as an apt-get update to see whether newer versions are available for you.
The next package operation is of course removing using apt. It will remove things you do not want. This is done by the apt-get remove command. Example as follows:
sudo apt-get remove audacity
Removing packages can sometimes have effects you won't want. APT will also remove any software that depends on it. An example right here, (you would never do this since libgtk is the graphical toolkit for Ubuntu) if you did this APT would insist dragging another 100 or so packages along with it. Always read the APT report before pressing "y".
A normal apt-get remove will leave behind the config files so that if you want it again you will not have to reconfigure it to your liking. If you want the config files deleted as well you would do as the following example: (same as the "mark for complete removal" in synaptic)
sudo apt-get remove --purge audacity
That will completely remove audacity (or whatever you want).
Finding Things in APT
Packages and packages and packages oh my! With the huge number of packages available to you, (even more after enabling the universe and multi-verse repositories) It might be a bit hard finding a certain package. The tool to find packages is called apt-cache and is used as so:
apt-cache search cd
Sometimes a search will have hundreds; even thousands of entries. (such as the one above) apt-cache will also look in the description if you do not tell it otherwise. To make APT search in just the title of the package you would do:
apt-cache -n search cd
The instruct being -n. This has shortened my search a bit. Another way to shorten searches and get what you are looking for easier are expressions. Here are two basic ones: ^ means start and $ means end. Say I wanted to find packages that start with cd (like cdextractor, cdtool or cdcover), I would do this:
apt-cache -n search ^cd
Wow! Alot smaller now that I have told it I wanted the name to start with cd and I want it only to look in the name of the package. Another way to search (and probably the most popular) is to combine apt-cache with grep like so:
apt-cache search burn | grep cd
Now I've found all cd burning apps. Once you have found what you are looking for just run an apt-get install or if you want some more info on the package you can use apt-cache showpkg like:
apt-cache showpkg cd
coverThis will show all the info of the package such as dependencies etc... Quite useful.
Source Package Compiling
Compiling is fun and easy, (for me) most source code is in the tarball format; tar files if you will. Those files have been compressed using either bzip or gzip. They normally de-compress into a directory holding several files. I think it's best to compile code as a normal user as not to harm your system if there is malicious code (and there is unfortunately) so create a directory in your home folder or something to which you will uncompress files. (Mines named just simply "code")
Uncompress your tarballs into the folder using the -c option as follows (and replacing "code" with the name of your directory):
tar zxvf nameoffile.tgz -C ~/code
tar zxvf nameoffile.tar.gz -C ~/code
tar jxvf nameoffile.bz -C ~/code
tar jxvf nameoffile.tar.b2z -C ~/code
If you don't know the compression method that has been used you can use the file command:
file nameoffile
Now change directories to ~/code/nameoffile (with cd). It is also recommended you go to the directory in nautilus and look for a "README" or "INSTALL" file because the software might require you to do things in a specific manner. Normally you would compile the source code like this:
./configure
This will run a script to see whether or not all the dependencies are correct and your build environment is right. If you are missing dependencies the script should tell you the ones you are missing and what it needs.
When the configure script is finished (has completed correctly), run this:
make
make will do the initial compiling of your software and to finish it of and install your software run:
sudo make install
If the compilation doesn't succeed check the errors and run
make clean
before you restart. To remove the software if you don't need/ want/ like it simply run:
sudo make uninstall
Article Credit Goes to nikoPSK
how can i install other application like microsoft office, adobe applications, and other program. i already install ubuntu only single partition. but i cant install those application i need.
…there is an error message prompting me when i upgrade using apt-get.. why is it so??
I downloaded Ubuntu Hardy Heron. I can’t connect to the internet via dialup. How can I download updates for Ubuntu from another computer with internet access? Thanks.
get the package from the computer with internet access via synaptics. the file is downloaded to folder /var/cache/apt/archive.
Put that file in the same folder on your computer.