
Sponsored Link
• Authenticates users or devices before allowing them access to a network
• Authorizes those users or devices for specific network services
• Accounts for and tracks the usage of those services
Freeradius Features
• An open and scalable solution
• Broad support by a large vendor base
• Easy modification
• Separation of security and communication processes
• Adaptable to most security systems
• Workable with any communication device that supports RADIUS client protocol
daloRADIUS is an advanced RADIUS web platform aimed at managing Hotspots and general-purpose ISP deployments. It features rich user management, graphical reporting, accounting, and integrates with GoogleMaps for geo-locating (GIS). daloRADIUS is written in PHP and JavaScript and utilizes a database abstraction layer which means that it supports many database systems, among them the popular MySQL, PostgreSQL, Sqlite, MsSQL, and many others.
It is based on a FreeRADIUS deployment with a database server serving as the backend. Among other features it implements ACLs, GoogleMaps integration for locating hotspots/access points visually and many more features. daloRADIUS is essentially a web application to manage a radius server so theoretically it can manage any radius server but specifically it manages FreeRADIUS and it's database structure. Since version 0.9-3 daloRADIUS has introduced an application-wide database abstraction layer based on PHP's PEAR::DB package which support a range of database servers.
Before Installing make sure you have Ubuntu 17.10 LAMP server installed and ready for freeradius.
Preparing your system
Open the terminal and run the following command
sudo apt-get install php-common php-gd php-curl php-mail php-mail-mime php-pear php-db php-mysql
Install freeradius using the following command
sudo apt-get install freeradius freeradius-mysql freeradius-utils
Create Freeradius Database
You can use the following command to create freeradius database
sudo mysql -u root -p
Enter password:
mysql> create database radius;
mysql> grant all on radius.* to radius@localhost identified by "password";
Query OK, 0 rows affected (0.00 sec)
Insert the freeradius database scheme using the following commands
sudo mysql -u root -p radius < /etc/freeradius/sql/mysql/schema.sql
Enter password:
sudo mysql -u root -p radius < /etc/freeradius/sql/mysql/nas.sql
Enter password:
Create new user for radius database
sudo mysql -u root -p
mysql> use radius;
Reading table information for completion of table and column names
You can turn off this feature to get a quicker startup with -A
Database changed
mysql> INSERT INTO radcheck (UserName, Attribute, Value) VALUES (‘sqltest', ‘Password', ‘testpwd');
Query OK, 1 row affected (0.04 sec)
mysql> exit
Bye
Freeradius Configuration
You need to edit /etc/freeradius/sql.conf file
sudo vi /etc/freeradius/sql.conf
Make sure you have the following details
database = mysql
login = radius
password = passwordUncomment the following
readclients = yes
Save and Exit the file
Now you need to edit the /etc/freeradius/sites-enabled/default file
sudo vi /etc/freeradius/sites-enabled/default
Uncomment the sql option in the following sections
accounting
# See “Authorization Queries” in sql.conf
sql
session
# See “Authorization Queries” in sql.conf
sql
Post-Auth-Type
# See “Authorization Queries” in sql.conf
sql
Save and Exit the file
Now edit /etc/freeradius/radiusd.conf file
sudo vi /etc/freeradius/radiusd.conf
#Uncomment the following option
$INCLUDE sql.conf
Save and exit the file
Now you can stop the free radius server using the following command
sudo /etc/init.d/freeradius stop
Run freeradius in debugging mode. If there is no error, you are ready to go.
sudo freeradius -X
Start the freeradius using the following command
sudo /etc/init.d/freeradius start
Test the radius server using the following command
sudo radtest sqltest testpwd localhost 18128 testing123
Ouput as follows
Sending Access-Request of id 68 to 127.0.0.1 port 1812
User-Name = "sqltest"
User-Password = "testpwd"
NAS-IP-Address = 127.0.1.1
NAS-Port = 18128
Message-Authenticator = 0x00000000000000000000000000000000
rad_recv: Access-Accept packet from host 127.0.0.1 port 1812, id=68, length=20
Daloradius Installation
You can download the Daloradius latest version from here
Once you downloaded the daloradius-0.9-9.tar.gz file you need to extract using the following command
$ tar xvfz daloradius-0.9-9.tar.gz
$ mv daloradius-0.9-9 daloradius
$ mv daloradius /var/www/html
Change Permissions
sudo chown www-data:www-data /var/www/html/daloradius -R
sudo chmod 644 /var/www/html/daloradius/library/daloradius.conf.php
Mysql database need to setup for daloradius.We need to do is to import the daloradius scheme into our existing radius database.
$ cd /var/www/html/daloradius/contrib/db
sudo mysql -u root -p radius < mysql-daloradius.sql
configure the following daloradius setting.
sudo vi /var/www/html/daloradius/library/daloradius.conf.php
Change the database password
$configValues[‘CONFIG_DB_PASS'] = ‘password';
Save and exit the file
Now you need to configure daloradius website under /etc/apache2/sites-available
sudo vi /etc/apache2/sites-available/daloradius.conf
add the following lines
Alias /daloradius "/var/www/html/daloradius/"
<Directory /var/www/html/daloradius/>
Options None
Order allow,deny
allow from all
</Directory>
Save and exit the file
Enable daloradius website using the following command
sudo a2ensite daloradius
Enabling site daloradius.
To activate the new configuration, you need to run:
sudo service apache2 reload
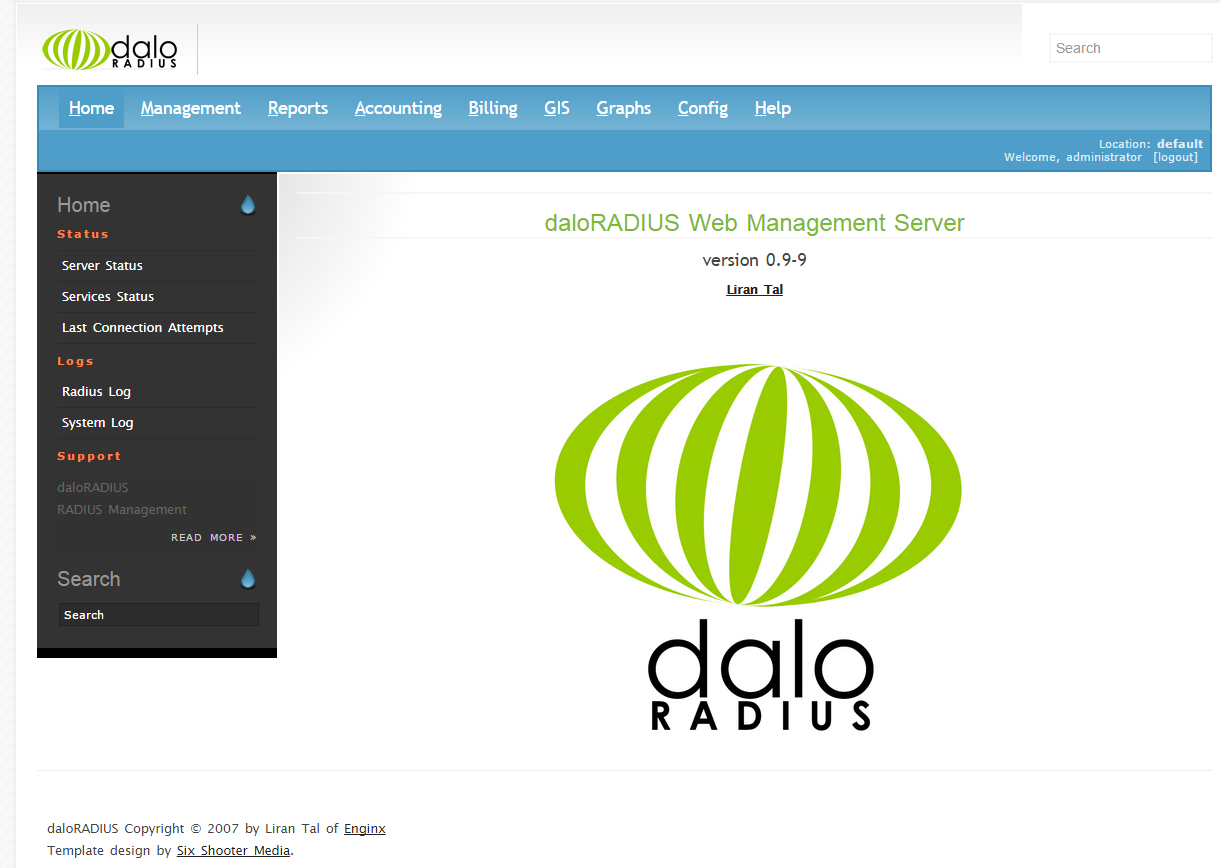
Daloradius Web GUI
you can access daloradius GUI using http://server-ip/daloradius and the login screen as follows

Use the following login details
username: administrator
password: radius
If you are running PHP 7 then you might see the following error
Database connection error
Error Message: DB Error: extension not found
To fix the above error you need to do the following changes Credit goes here
Changing file library/daloradius.conf.php
It's required to update daloRADIUS's database connection code so that it identifies the MySQL server using the new and improved mysqli driver:
Open for editing the file library/daloradius.conf.php and locate the configuration variable CONFIG_DB_ENGINE and change it to the value of mysqli (it is now probably set to mysql, notice the extra i). It should end up looking as follows: $configValues[‘CONFIG_DB_ENGINE'] = ‘mysqli';
Changing file library/opendb.php
Open for editing the file library/opendb.php
At the very end of the file just add this new line of code: $dbSocket->query("SET GLOBAL sql_mode = ";"); which makes the MySQL version work with less strict SQL syntax
Once you logged in you should see similar to the following screen
Thanks for the guide. However, I’m having a hell of a time getting past this line of code:
mysql> create database radius;
mysql> grant all on radius.* to radius@localhost identified by “password”;
I keep getting syntax error message on line one can you please help.
The two .sql files do not exist:
sudo mysql -u root -p radius < /etc/freeradius/sql/mysql/schema.sql
sudo mysql -u root -p radius < /etc/freeradius/sql/mysql/nas.sql
Quote are incorrect, insert statement fails:
INSERT INTO radcheck (UserName, Attribute, Value) VALUES (‘sqltest’, ‘Password’, ‘testpwd’);
Replace ‘ with ‘.
Configuration is actually in /etc/freeradius/3.0 (not just /etc/freeradius). There is no file sql.conf anywhere, nor there is a file containing ‘readclients’, which needs to be commented out.
[quote]
Nihia on March 8, 2018 at 9:00 pm said:
Thanks for the guide. However, I’m having a hell of a time getting past this line of code:
mysql> create database radius;
mysql> grant all on radius.* to radius@localhost identified by “password”;
I keep getting syntax error message on line one can you please help.
[/quote]
correct line should be:
grant all privileges on radius.* to ‘radius’@’localhost’ identified by ‘password’;
forgot privileges (not always needed) and might want to add single quotes around user, localhost and password.
[quote]
sugarbravo on April 4, 2018 at 7:18 pm said:
Configuration is actually in /etc/freeradius/3.0 (not just /etc/freeradius). There is no file sql.conf anywhere, nor there is a file containing ‘readclients’, which needs to be commented out.
[/quote]
correct. here is how the sql.conf should look
sql radius {
database = “mysql”
driver = “rlm_sql_${database}”
server = “localhost”
port = 3306
login = “radius”
password = “Password”
radius_db = radius
acct_table1 = “radacct”
acct_table2 = “radacct”
postauth_table = “radpostauth”
authcheck_table = “radcheck”
authreply_table = “radreply”
groupcheck_table = “radgroupcheck”
groupreply_table = “radgroupreply”
usergroup_table = “radusergroup”
#note that delete_stale_sessions used to be deletestalesessions. this changed in 3.0
delete_stale_sessions = yes
sqltrace = no
sqltracefile = ${logdir}/sqltrace.sql
num_sql_socks = 5
connect_failure_retry_delay = 60
lifetime = 0
max_queries = 0
# dailup was used at some point but im not using it because so.
#$INCLUDE sql/${database}/dialup.conf
}
apperently you can also add “readclients = yes” in there.. i figure thats when you are using the nas table..
Hi Guys, I am trying to install radius on 17.10 in the azure cloud for point to site vpn clients. I understand that there is an issue with current versions /etc/freeradius/sql/mysql/schema.sql does not exist. Should I nano and create the file in the 3.0 folder and then rerun the command with the appropriate adjustment? Also, in the conf it shows dialup commented out. Since I’m using this for authentication from an azure vpn gateway should dialup be uncommented? Thanks for any help you can give, I can usually bumble my way through this stuff but radius along with azure are completely new to me and I don’t want to use active directory and enable a full domain.