
Sponsored Link
Install WiFi Radar in ubuntu
sudo aptitude install wifi-radar
This will complete the installation.
Using WiFi-Radar
If you want to open goto Applications--->Internet--->Wifi-radar

This will prompt for root password enter and click ok

This should detect available wireless networks check your wireless and connect
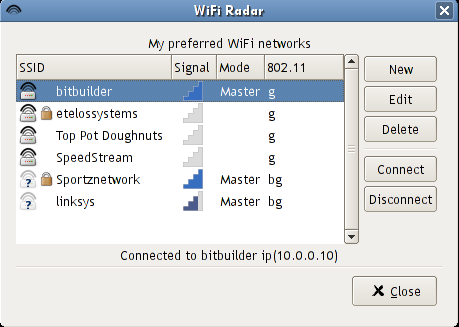
If you want to create new profile open the application and click on new

You can see similar to the following scree enter all the details and you are ready for wireless

This seemed to load fine. The GUI doesn’t show the connect button. The banner isn’t blue either if that makes a difference.
hi all,
sudo aptitude install wifi-radar <<<< where I should paste this code ? I’m a really-really new in this Ubuntu environment … Plz help me out …
Thanks,
Fadz8L
@fadz8L
go to Applications—>Accessories—>Terminal
this will open terminal after open the terminal you need to enter the command you have menctioned
Will this work using ndiswrapper?
it seems like it wont, I can pick up my neighbors ssid when i right click on the network icon
but using WiFi-radar it wont…..
ok i dont have this wi fi radar but still manage to receive some signal when i boot my system.what difference does it make if i install it??? can i b assured of better speed or signal strength???
hello, I have a problem with my wifi-radar, I had installed my wireless card, after installed wifi-radar so there was a problem I didn’t have the packed menu so I installen it; but now my wifi-radar doesn’t work
I click on wifi and it asked the key to the root, I give it and then the window disappears but wifi-radar doesn’t appear like I didn’t call it. Could you help me please.
i got radar pro he keeps sayin have u got a wireless card is connent how wat it mean
i got pro radar/it says””number make sure u have a wirless card and its conneted 53 i NEED HELP
Hi, I am running ubuntu 8.10 Intrepid Ibex on a Toshiba lap top with a trifecta of operating systems on it the first is an OEM setup of Windows Vista, the second is Windows XP SP2. I have Atheros 5007eg wireless network adapter that works fine in both installations of windows. However, in Ubuntu I have gone to a terminal window executed lshw -c command which returned a big fat “the network is unclaimed” line and some other info further down I also got the device is disabled or not enabled line I know though that the light is on because the hardware switch is on. I do not have ndiswrapper installed yet because I’m not really sure which version to obtain for Intrepid Ibex and I really need to know that since I do not have access to an ethernet connection. I downloaded wifi radar because I read on another forum that it made one member’s wifi card “jump to life” as he put it. However, when I attempted the same remedy it didn’t work and as a result ran the lshw -c command and much to my dismay learned of the bad news about my card. I have some previous experience with two older versions of Suse linux distros so although I’m not exactly a noob I haven’t really touched linux in sometime and my memory isn’t serving me. I could use some help here and would greatly appreciate any steer in the right direction please. Thanx in advance.
John Doe, I had the same issue. Can you get on a wired connection? If so, go to update. Let update manager find available updates. Install updates. Once this is done, open hardware manager and let it search. It may want to install updated drivers for the wifi. Allow installation and see if your connection is now available.
I’m a newb a this and after hours of reading, trial and error, nothing else did anything. This way worked and got me on line.
Hi guys,
When i start wifi-radar, i see only this text:
“Failed to execute child process “su-to-root” (No such file or directory)”
..sorry 4 my english 😛
help me please …. 🙂
Patrezz,
When i start wifi-radar, i see only this text:
“Failed to execute child process “su-to-root” (No such file or directory)”
Same story here, to get it to work, I opened a terminal,
(Applications>Accessories>Terminal), and typed
“sudo wifi-radar” I think it works this way cause Ubuntu
uses sudo and not su
Wifi Radar has a bug. Change the command line in the menu to:
gksu /usr/sbin/wifi-radar
and it will work fine – have fun setting it up tho!
Atheros AR5007 🙂 This took ages and I finally got the solution at:
http://ubuntuforums.org/showthread.php?p=6201697#post6201697
which is:
sudo -s
echo ‘blacklist ath_pci’ >> /etc/modprobe.d/blacklist
apt-get install ndiswrapper*
wget ftp://ftp.work.acer-euro.com/notebook/aspire_4710/driver/Wireless_Atheros.zip
unzip Wireless*
cd Atheros
unzip HR*
ndiswrapper -i net5211.inf
echo ‘ndiswrapper’ >> /etc/modules
sudo reboot
Sets the AR5007 up perfectly… just remember that if you’re using knetworkmanager that it doesnt handle WPA easily – the only way Ive got it to work is by using WEP encryption (not as good but less hassle)
And as far Wifi Radar.. well I guess that life is just sometimes too short :p
Being a beginner at ubuntu I tried to install the wifi radar. It soon became obvious that all was not right can any one tell me which directory or folder the installation file should be in and weather it should have been extracted? from the zip file or not
best regards Bob Charman
Hi Robert, I think it is best you start to tell which LINUX distro you are using. If it is Ubuntu you find the program in synaptic and in add/remove menu under applications. Then you do not have to bother about the download places.
Hi, “Could not get IP adress ”
when i try to connect with wifi radar, Ive got this
message : Could not get IP adress
i don’t know how to fix it ?????????????
I entered sudo aptitude install wifi-radar but i got:
Reading package lists… Done
Building dependency tree
Reading state information… Done
Initializing package states… Done
Writing extended state information… Done
Couldn’t find any package whose name or description matched “wifi-radar”
Couldn’t find any package whose name or description matched “wifi-radar”
No packages will be installed, upgraded, or removed.
0 packages upgraded, 0 newly installed, 0 to remove and 0 not upgraded.
Need to get 0B of archives. After unpacking 0B will be used.
Writing extended state information… Done
Reading package lists… Done
Building dependency tree
Reading state information… Done
Reading extended state information
Initializing package states… Done
It said it couldn’t find any package with name or description wifi-radar
@Rolando: wifi-radar [1] is in the “Universe” repository. Please read below [2] for instructions how to enable the universe repository:
[1] http://packages.ubuntu.com/karmic/wifi-radar
[2] http://www.ubuntugeek.com/how-to-enable-the-universe-and-multiverse-repositories-in-ubuntu-804-hardy.html
I do not get it, it will not work for me in Ubuntu 9.10, it do before 9.10.
desktop:/$ sudo wifi-radar
[sudo] password for xxxxxx:
Traceback (most recent call last):
File “/usr/sbin/wifi-radar”, line 2915, in
confFile.read()
File “/usr/sbin/wifi-radar”, line 2798, in read
self.auto_profile_order = eval(self.get_opt(‘DEFAULT.auto_profile_order’))
File “”, line 1, in
NameError: name ‘linksys’ is not defined
I have a intel wireless card.
i downloaded wifiradar in my usb stick using vista then i boot in ubuntu 9.10.. im just wondering how can i install wifi radar from my usb, i dont have internet connection so i cant use sudo get apt blah blah 🙂 is there any code or how can i path my usb to run wifi radar please help me thanks <3
ps:
i installed ubuntu using wubi.. is that why i cant see any wireless connection?
Wifi Radar seems to work in earlier version of ubuntu just fine. However I just installed ubuntu 9.10 and things are kind of flaky.
hi
could anyone give me the link to download
this software
Please….
@Kubda
You dont really really any need a link to INSTALL a software/application in ubuntu.
What you have to do is to enter the command
sudo apt-get install wifi-radar
in your terminal and press enter then enter your password(usualy the one you uses to log in to ubuntu) the terminal will install/download your application
Terminal can be found @ application—accessories—terminal