
Sponsored Link
Most ISPs provide dial-up connections supporting PPP because it is a fast and efficient protocol for using TCP/IP over serial lines. PPP is designed for two-way networking; TCP/IP provides the transport protocol for data.
PPP (Point to Point Protocol) uses several components on your system. The first is a daemon called pppd, which controls the use of PPP. The second is a driver called the high-level data link control (HDLC), which controls the flow of information between two machines. A third component of PPP is a routine called chat that dials the other end of the connection for you when you want it to.
Configuring a Dial-Up Connection in Ubuntu
Ubuntu includes some useful utilities to get your dial-up connection up and running.Here is the following ways you can connect to your dialup connection
1)Using your networking option in Ubuntu
2)using gnome-ppp
3)using kppp (For Kubuntu)
4)using wvdialconf & wvdial
5)using pppconfig & pon/poff
first thing you need to make sure your modem drivers are installed or not.If you want more details about modem drivers in ubuntu and installation check here
Now we will see 3 ways how to configure dialup connection in ubuntu
Before Starting
Before configuring Dial-up connection you need to have the following information from your ISP
1)Username
2)Password
3)Dail-in number
Configuring a Dial-Up Connection using Networking option
you can go to System—>Administration —>Networking
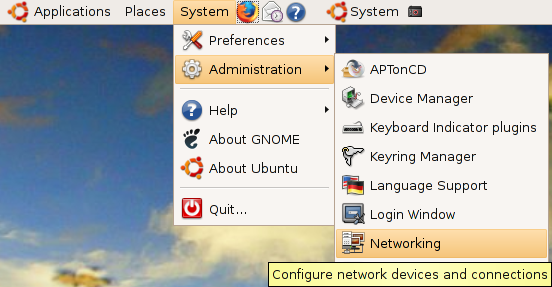
Once it open the application you should see the following screen

In the above screen select modem connection option and click on properties you should see the following screen

The first thing you will need to do is to enable the connection by ticking the Enable this connection box,now you need enter your ISP's phone number as well as your username and password

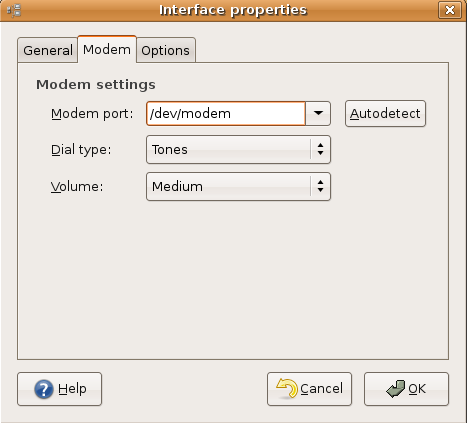
Next, click on the modem tab to specify details about your modem and also configure the speaker volume. Most telephone systems use tone dialling nowadays, so make sure this is selected . I have selected the speaker volume on medium.
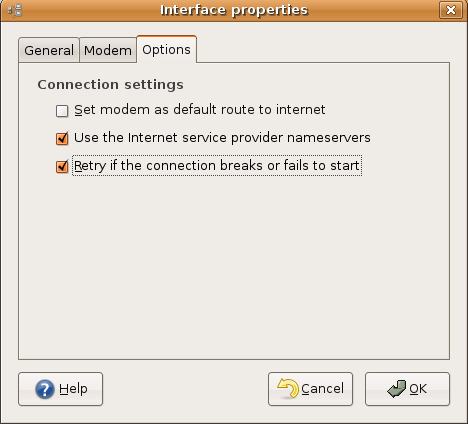
Now you need to click on options tab If you are using a laptop, then you will probably want to uncheck Set modem as default route to the Internet whilst you are on a LAN, otherwise you may struggle to see anything! Tick it when you are expecting to use your dial-up connection though, and Ubuntu will use this connection to get out onto the Internet.You need to select other two options checked.
Now You can use the Gnome Modem Monitor and Network Monitor panel if you want to stop, start and monitor modem connections.
Configuring a Dial-Up Connection using pppconfig
configure a connection using pppconfig, a command line utility to help you to configure specific dial-up connection settings.This is a command line based option to manage dialup connections.
Open a terminal from Applications > System Tools > Terminal and type
sudo pppconfig
Now you should see the following screen here you need to select "Create Create a connection" select ok and press enter

Here you need to enter provider name and you can leave default one and in this example i am giving "comcast" select ok and press enter

Next screen you need to select "Dynamic Use dynamic DNS" select ok and press enter

You need to select Authentication method here i am selecting "chat :Use chat for login/password :Authentication" select ok and press enter

Select login prompt option leave default select ok and press enter

Select password prompt option leave default select ok and press enter

Enter the username given to you by your ISP in this example i am using "ruchiw" select ok and press enter

Enter the password given to you by your ISP in this example i am using "myfirstpassword" select ok and press enter

Enter the modem speed as "115200" select ok and press enter

Select method of dialing as "Tone" select ok and press enter

Enter the number to dial select ok and press enter

Choose your modem configuration method if you want to detect your modem automatically select yes otherwise select no in this example i am selecting no select ok and press enter

Select the modem port and i leave the default option select ok and press enter

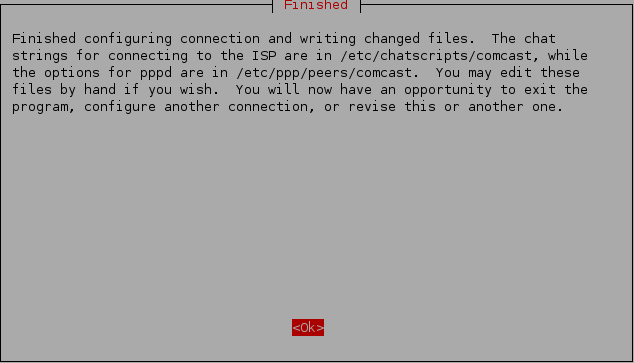
Here is the complete details you have choosen for your provider connection in this example comcast

Finished the connection settings select ok and press enter
Select "Quit Exit this utility"
Exit the terminal window using the following command
exit
Connecting to your ISP
Before you connect for the first time you need to add yourself to both the dip and dialout groups by using the commands
sudo adduser YOURNAMEHERE dip
sudo adduser YOURNAMEHERE dialout
# connect to the ISP configured as "comcast"
pon comcast
# disconnect the ISP configured as "comcast"
poff comcast
If you are trying to connect as default "provider" you need to use the following commands to connect and disconnect
pon
poff
You can check the last messages generated by these commands with
# shows the (status) messages generated by pon and poff
plog
Configuring a Dial-Up Connection using gnome-ppp
GNOME PPP is an easy to use graphical dialup connection configuring and dialing tool with system tray icon support.It uses GNOME/GTK+ for its graphical interface and integrates well in GNOME desktop environment, but it can be used in other environments.
It also uses WvDial dialer as its backend, providing simple configuration via config files. You can also use plain wvdial if you don't have X running.
Install gnome-ppp Ubuntu
sudo apt-get install gnome-ppp
This will complete the installation.
If you want to open the application go to Application--->Internet--->GNOME PPP

Once application opens you should see the following screen

In the above screen you need to click on setup to configure your settings you should see the following screen configre the modem settings

Next click on networking tab to configure network settings

Next click on options tab to configure general options

Once you have all the details enter the details you can see the following screen

@Abu Anand,
You can not establish a dial up connection using Network Configuration(found in Preferences)or located on the upper panel(Mini computer icon).
Use this page. Go back to the top and look at the instructions and graphics for Wvdial. You will need to learn how to use Terminal and Command Line to get your 8.10 online. Once you get the computer online. You can install GnomePPP and dial in with a single click.
If you don’t understand. Reply and I will try to simplify the directions. I am writing to your from an 8.10 setup on dial up. So it can definitely be done. Good Luck.
Hey dude, I didn’t know this could be done, and reading your tutorial got me thinking…
The info that you enter, where do you get that from? Like for example, I got a laptop…and I got a mobile nokia 3110c classic, now when there isn’t wifi about, I could connect to the net through my mobile (as a modem)…using my mobiles internet…
Only prob is, I dont know what number it needs to dial, what username and what password. And I think to ask my mobile provider, they would want me to pay before they divulge that info.
Is there any way I can extract this info from my mobile itself?
Thanks dude, now I’m gonna probe the net a little with these ideas thanks to you!
Hey Canda Lee,
If I understand your question correctly; you are asking how to connect to a dial up account with a mobile(celluar) account.
In the past it was possible to use KPPP which is the KDE version of GnomePPP to accomplish that very action. But even then it was necessary to have a valid dial up account which you don’t possess and there is no way to extract such information with your mobile connection. Your mobile company would not charge you for information that they can not provide because it is an unanswerable question.
I suggest that you search the Net for Free Dial Up ISPs as there are still a few around, open an account then attempt to use GnomePPP or KPPP to connect with your mobile card. It seemed to be a somewhat complicated series of steps to follow.
Take a look at the links below to help you test that theory.
http://forums.whirlpool.net.au/archive/808806
http://markus.wernig.net/en/it/usb-serial-handy-ppp.phtml
The easiest thing would be to buy a mobile broadband card such as Virgin Mobile Broadband and a $20.00 top off card. You could then access the Net whenever you want at a reasonable rate and time frame. Think of it as Trac Fone for Laptops.
Good Luck
I did it! Ubuntu is awesome! I have done this on Karmic and Lucid as follows…
Like I said earlier, I have a Nokia 3110c and I have internet access on my mobile. And when there is no wifi available for my laptop, I can now connect my mobile to my laptop via the data cable, and surf the net on my laptop using the mobiles internet…
Here’s how…it’s dead easy…Ubuntu has done all the work for you…
Just get your mobile and its data cable which will allow you to connect your mobile to your laptop’s usb port.
Go to your Network Manager on the Top Panel and click to see available connections, and you will find a new entry there saying “New GSM Network” (or something similar, what it says there will differ slightly on Karmic and Lucid).
Click on that new entry “New GSM…” and Ubuntu will bring up a Wizard walking you through the steps to set it up…
Pick your country (for me it was “Britain (UK)”)
then pick your mobiles provider (for me it was “o2”)
then choose what type of contract you have (choices were “Contract”, “Contract (faster)” and “Pay as you go (prepaid)” for me it was “prepaid”)
and that is it! Job Done!
Now if you go up to your Network Manager, you will have a new Mobile Internet Connection available (for me it was called “o2 prepaid”)
Click on it, and you’ll see it establishing the connection, then connect…now open up Firefox and surf!
Note: Searching on the net I found the only way to do this in Winblows is to use Nokia’s PC-Suite software, which I tried as well…and the Nokia PC-Suite software communicated with my mobile, then my mobile displayed on its screen “Contact your provider to subscribe to data packet exchange…” or-something-er-other. I have read that mobile providers want you to pay for that additional service of using their internet on other devices. They call it tethering.
Thanks Canada Lee! Congratulations on your success and for sharing the solution. I will familiarize myself with your instructions.
URGENT: There has been an effort to conceal dangerous command line commands in various Ubuntu Help Forums. These instructions can erase your hard drive and destroy data to attached devices such flash drives. Use extreme caution when running commands in Terminal/Console on advice from help forums. You may read an Official Alert with more detailed info from the link below.
http://ubuntuforums.org/forumdisplay.php?f=319
I’m sorry, I might just need to clarify a couple of things…I didn’t mention when to CONNECT the mobile…
Following my previous post…
Just get your mobile and its data cable which will allow you to connect your mobile to your laptop’s usb port.
Now connect your mobile to your computer via the data cable.
Note: when doing so, some mobiles will detect connection to a computer and will then ask you what TYPE of connection to establish with the computer. Choices are DATA STORAGE for transferring files only, or (for my particular mobile) NOKIA MODE to be able to access more capabilities. Select NOKIA MODE, or the equivalent for your mobile.
Now go to your Network Manager on the Top Panel and click to see available connections, and you will find a new entry there saying “New GSM Network” (or something similar, what it says there will differ slightly on Karmic and Lucid).
The rest of the steps are the same as in my previous post.
Cheers!
Thanks this help me out alot.
Sir,
I live in India (Tamil Nadu). I am using BSNL CDMA 2000 1X Wireless USB Modem. It is like dialup modem. How do I install in Ubuntu? Please guide me.
This image is this URL
http://2.bp.blogspot.com/_GNvhjcFvxVk/S8MSKeiDqhI/AAAAAAAAAdY/V47b_gJbOYw/s1600/cdma1X.jpg
Hello Ottakkooththan,
Have you tried plugging the Modem into the computer and checking to see if it is detected? It not give that a try. If the modem is detected you may be able to use Wvdial to connect to the Internet.
If the modem is not detected it still may be possible to “point’ Ubuntu to the modem by installing the modem’s drivers. See the paragraph below.
What version of Ubuntu are you using? If it is 9.04 or Higher it you may be able to install and run Proprietary Drivers(Windows) on your Linux machine. Do this:
Goto> System>Administration>Hardware Drivers
By clicking on Hardware Drivers, Ubuntu will look for “Proprietary” drivers that can run the modem. Of course it will be unlikely that you have them{ The Enable Button will be grayed out and unusable) so it will be necessary to download them. You may find free drivers for your modem here:
http://ptf.com/bsnl/bsnl+cdma2000+1x+wireless+usb+modem+driver+for+u100/
You will need to make a Folder for the download file. Extract the zip(download) file into the folder you have made. You may not understand what each of the files mean but simply allow them to open in the folder you have made. This is important as it makes a location that Ubuntu can point to find drivers to make the modem work.
Repeat the following:
Goto> System>Administration>Hardware Drivers
If you have extracted the driver files correctly. The CDMA Driver should be detected. You will be able to press the “Enable” box that will appear in the Hardware Drivers Window.
Restart your computer. Insert the Modem then try the Wvdial procedure.
I have not tried this method with Ubuntu 8.10 and earlier but it should be a similar process(If your Ubuntu Distro is 8.10 or earlier).
Good Luck.
how to create manual network connection in ubuntu
Sheshakiran,
You don’t have to create a manual network connection. If you have DSL(Broadband)then simply insert the Ethernet Cable into your computer. Ubuntu detects instantly without having to create anything. Test this past clicking on the Firefox icon and see if the browser connects.
If you are trying to connect wirelessly–you still should not have a problem. Verify that your Network card is properly installed. Ubuntu should be able to drive it without incident. Place your cursor on the Network Manager Icon on the top Right corner of your monitor screen. You should see a Network Connection Window appear. Select whatever Wireless Option shown. Then try the same test..Open Firefox and see if connects.
Good Luck.
hi! i am using BSNL CDMA CT800P.its like a dialup modem.how do i install in ubuntu..?
Hello Rajprakash,
I am sorry for the delay in replying. I am afraid you asked your question during a very busy time of the Holiday Season.
I am not familiar with the modem that you have requested help with but I did do a little research and it may be possible to get things going.
If I am not mistaken that modem is a USB type and the Instructions Posted Above starting with:
” Ice Warrior says:
November 2, 2010 at 3:15 am
Hello Ottakkooththan,”
The directions found in that Post should work for you too with one exception. You will need Drivers specific to that Modem Model. Look here for those files:
http://bsnlbbmodemdrivers.blogspot.com/2010/01/blog-post.html
Scroll back to the Post I just mentioned. Read it several times. You may need to print it and apply those steps to start your modem working. Of course, before doing anything….Connect the modem to the computer and see if Ubuntu detects it. You may not have to do anything more. I don’t know which Version of Ubuntu you are running. If you are using 9.10, 10.4 or Higher. Things might work “right out of the box”.
Good Luck.
I have been trying to set up a dial up modem , off and on , for three years.I have used three ubuntu systems. I am now using 9.10. I have had the same problem with all three. There is no “networking” , there is networking tools under authorazations and network connections under appearences. None of these allow me to set up the modem and the internet connection. I am using an usr5686e external modem and the system recognizes the modem. What do I do, other than staying with windows.
Joe Normand
Hello Joe,
I built a 9.10 Karmic Setup for a person just under a year ago and that person used Dial up too. So this issue is very simple to remedy.
You stated that the modem is detected and that gives you the option to use Wvdial. You don’t need to worry with “Networking” or “Permissions”. By using Wvdial you will be able to go online then use the ADD/REMOVE Software Center to install Gnome PPP or K-PPP which are almost identical to Windows GUI Dialup Window…I am using the Gnome version at this very moment on the ancient but reliable 8.10 Intrepid Ibex System.
This is how to make Wvdial work.
#1. Open Terminal
#2. Type: sudo gedit /etc/wvdial.conf
#3. Enter your Password when prompted. NOTE! Your PW will be INVISIBLE…No asterisks or little dots. Press Enter on keyboard
#4. A Gedit Notepad window will appear–You will see this:
[Dilaer Defaults]
Phone=
Username=
Password=
New PPPPD= yes
#5. Type in the info…Phone= Dial Up number of your ISP
Username=Whateveryournameis:
Password=WhateryourIntenetServiceProviderPW
New PPPD + yes(leave as is)
#6. Save the Text Document then close.
#7. In Terminal type.. sudo wvdial Press Enter on keyboard
#8. Since you entered your PW in the previous step..You may not be prompted for the PW again(sorry I’ve forgotten it’s been over a year since I dialed out with Wvdial) or you might…if so type and press enter on keyboard
#9. Wvdial will now connect to the modem…dial the number, UserName, PW to ISP you placed in the Text document and connect you to the Internet.
No need to go back to Windows! 😀 🙂 😉
MAKE SURE YOUR MODEM IS TURNED ON AND ATTACHED TO THE COMPUTER CORRECTLY or none of the above will work and you be even more frustrated over
something so simple.
Good Luck!
Hey Ice Warrior,
From the posts i’ve read it seems to me that most of the guys are using dial up modems. i on the other hand am using a reliance netconnect ZTE usb modem.
i just bought a dell inspiron 15r and installed ubuntu 10.10 on it. a day prior to buyin this laptop, i managed to get the usb modem working on ubuntu 10.10 on my old laptop. this i did by following instructions which i found online ( and i cant seem to find anymore!!!)
from what i remember, the instructions involved the following steps
1. install wvdial
2. go to the wvdial conf and paste some settings(found online)
3. locate my modem on the usb
4. note down some serial number ie 19d2 and fff1
5. enter this number someplace ( i cant for the life of me remember where!!!!!)
i cant seem to remember if there were any other steps, but in the end i was able to get it to work
i need ur help on this
thanks a million
jeevak
hey,
i think i managed to find the page from where i got the instructions the last time i got my modem to work here it is
http://gadupdates.blogspot.com/2010/07/setting-up-reliance-tata-zte-8710-in.html
i still cant seem to get it to work!!! been tearing my hair out for about 36 hrs now!!!
help!!!
and please keep it as simple as possible..
thanks so much
Jeevak
Hey Jeevak,
I am very happy to help you.
#1. It seems that all you really require are the Specific Command Instructions for Wvdial Conf as they relate to a USB Connection.
#2. The following directions are based on configuring for your Exact Model Modem but they should work with any USB modem.
#3. Let’s edit Wvdial for USB( You can Copy/Paste. I will not include quotation marks ( ” “). Notice the difference in the command line we will use. Usually, I would instruct use “sudo gedit /etc/widial.conf” but the command below is specifically for a USB Modem configuration. Some Tech Help sites advise to Use Both Commands Lines but based on my research–Plus I actually tried it on a Laptop Running 9.04. Using the Command line below should be sufficient.
Command Line: sudo vi /etc/wvdial.conf
#4. A Text Editor Document will Open. You must Enter All the Data shown:
[Dialer zte]
Init1 = ATZ
Init2 = ATQ0 V1 E1 S0=0 &C1 &D2 +FCLASS=0
Modem Type = Analog Modem
Phone = #777
Username = Your phone number
Password = Your phone number or password if any
ISDN = 0
SetVolume = 0
FlowControl = Hardware (CRTSCTS)
Modem = /dev/ttyUSB0
Dial Command = ATDT
Baud = 460800
Stupid Mode = 1
#5. Where Applicable type the Necessary Information–UserName-ISPNumber-PW .. Save then Close the Wvdial Conf Document.
#6. Type: sudo wvdial zte
#7. If prompted for PW–Type then Press Enter. And your Modem should activate and connect to the Internet.
Here are some Reference Links should you need them.
A. http://ubuntuforums.org/archive/index.php/t-1091189.html
B. http://ideasareimmortal.blogspot.com/2010/02/getting-reliance-netconnect-usb-modem.html
C. http://techie-buzz.com/how-to/how-to-connect-tata-photon-whizplug2surf-with-ubuntu-linux.html
These instructions should get you up and running. Good Luck. 😀
hey Ice
when i type sudo vi /etc/wvdial.conf anpther terminal opens up. i enter all the details as above but after that i dont know how to save it. if i try to close it, it warns me saying i’m about to close the terminal.
i also tried the sudo gedit /etc/wvdial.conf and entered everything there but it says–> WvDial: Internet dialer version 1.60
–> Cannot get information for serial port.
–> Initializing modem.
–> Sending: ATZ
OK
–> Sending: ATQ0 V1 E1 S0=0 & C1 & D2 +FCLASS=0
ATQ0 V1 E1 S0=0 & C1 & D2 +FCLASS=0
ERROR
–> Bad init string.
–> Cannot get information for serial port.
–> Initializing modem.
–> Sending: ATZ
ATZ
OK
–> Sending: ATQ0 V1 E1 S0=0 & C1 & D2 +FCLASS=0
ATQ0 V1 E1 S0=0 & C1 & D2 +FCLASS=0
ERROR
–> Bad init string.
–> Cannot get information for serial port.
–> Initializing modem.
–> Sending: ATZ
ATZ
OK
–> Sending: ATQ0 V1 E1 S0=0 & C1 & D2 +FCLASS=0
ATQ0 V1 E1 S0=0 & C1 & D2 +FCLASS=0
ERROR
–> Bad init string.
jeevak@jeevak-Inspiron-N5010:~$ sudo gedit /etc/wvdial.conf
jeevak@jeevak-Inspiron-N5010:~$ sudo wvdial zte
–> WvDial: Internet dialer version 1.60
–> Cannot get information for serial port.
–> Initializing modem.
–> Sending: ATZ
ATZ
OK
–> Sending: ATQ0 V1 E1 S0=0 &C1 &D2 +FCLASS=0
ATQ0 V1 E1 S0=0 &C1 &D2 +FCLASS=0
OK
–> Modem initialized.
–> Sending: ATDT#777
–> Waiting for carrier.
ATDT#777
CONNECT
–> Carrier detected. Starting PPP immediately.
–> Starting pppd at Sun Apr 17 03:04:16 2011
–> Pid of pppd: 2395
–> Using interface ppp0
–> pppd: ?en @\n
–> pppd: ?en @\n
–> pppd: ?en @\n
–> pppd: ?en @\n
–> Disconnecting at Sun Apr 17 03:04:17 2011
–> The PPP daemon has died: Authentication error.
–> We failed to authenticate ourselves to the peer.
–> Maybe bad account or password? (exit code = 19)
–> man pppd explains pppd error codes in more detail.
–> I guess that’s it for now, exiting
–> The PPP daemon has died. (exit code = 19)
what should i do???
Hey Jeevak,
I understand your problem and it’s simple. You made a very Rookie(novice) mistake. You opened TWO–Terminals. Only ONE- Terminal should be open.
When you “Edit” information into or delete from a Configuration File–that Edit is done in a Gedit which is a Notepad-like Document also called Text Editor(in older Versions of Ubuntu).
Try this:
#1. Open JUST One Terminal
#2. Type sudo vi /etc/wvdial.conf
#3. Give your PW-Press Enter-Then Wait for approx One Second. A Gedit Document will appear like magic.
#4. Copy/Past the following:
Dialer zte]
Init1 = ATZ
Init2 = ATQ0 V1 E1 S0=0 &C1 &D2 +FCLASS=0
Modem Type = Analog Modem
Phone = #777
Username = Your phone number
Password = Your phone number or password if any
ISDN = 0
SetVolume = 0
FlowControl = Hardware (CRTSCTS)
Modem = /dev/ttyUSB0
Dial Command = ATDT
Baud = 460800
Stupid Mode = 1
#5. You must make the following changes in the Information you just pasted into the Gedit–so they fit your Personal Information.
Username = WhateverJeevaksUsernameis
Password = WhateverJeevaksPasswordis
ISDN = whateveryJeevaksInternetProviderTelNumis
LEAVE ALL THE OTHER COPY/PASTE EXACTLY AS IT APPEARS IN THE EXAMPLE.
#6. Double Check your work. Then go to the File Menu in Gedit and Select Save. Close the Gedit Document.
#7. You should now see the ORIGINAL Terminal you opened at the start of this attempt.
#8. Type: sudo wvdial
#9. You probably will not be prompted for the Password because you will have already entered it when you “edited” the Gedit Document. The Modem will now attempt to dial the Internet through your USB modem. 😉
The type of mistakes you made are common among people first learning how to use Command Lines and Terminal. It’s not a big deal. 🙂 Don’t worry about it.
Take your time and try again. If you are still having trouble don’t hesitate to ask for more help. 😉 Good Luck. 🙂
Jeevak…OOps..I see a slight Omission in the Wvdial Edit Instruction. Copy this Version of #4.
[Dialer zte]
Init1 = ATZ
Init2 = ATQ0 V1 E1 S0=0 &C1 &D2 +FCLASS=0
Modem Type = Analog Modem
Phone = #777
Username = Your phone number
Password = Your phone number or password if any
ISDN = 0
SetVolume = 0
FlowControl = Hardware (CRTSCTS)
Modem = /dev/ttyUSB0
Dial Command = ATDT
Baud = 460800
Stupid Mode = 1
Sorry about the error but One missing character could cause things not to work properly and I know already frustrated by your earlier. attempts. Follow all the other Directions as shown. 😉
#1 if i type just sudo vi /etc/wvdial.conf then a Gedit type of file doesnt open up! the terminal window in which i typed the above command disappears and another with the settings appears. if i have to make corrections in that, its extremely tedious as i have to constantly press the “insert” key to make any enteries.
i wish i could show u a picture of the window that opens up…….
its a window with no toolbar. just a minimize, expand and close icon in the corner
also, now, when i type the above command this is what i get and it looks a little scary!!
“E325: ATTENTION
Found a swap file by the name “/etc/.wvdial.conf.swp”
owned by: root dated: Sun Apr 17 02:28:19 2011
file name: /etc/wvdial.conf
modified: YES
user name: root host name: jeevak-Inspiron-N5010
process ID: 8987
While opening file “/etc/wvdial.conf”
dated: Sun Apr 17 03:04:07 2011
NEWER than swap file!
(1) Another program may be editing the same file.
If this is the case, be careful not to end up with two
different instances of the same file when making changes.
Quit, or continue with caution.
(2) An edit session for this file crashed.
If this is the case, use “:recover” or “vim -r /etc/wvdial.conf”
to recover the changes (see “:help recovery”).
If you did this already, delete the swap file “/etc/.wvdial.conf.swp”
to avoid this message.
“/etc/wvdial.conf” 15 lines, 280 characters
Press ENTER or type command to continue”
also bit confused about my ISDN number…never ahd to look for it before…where?whom should i ask/look for it?
Hey Jeevak,
ISDN Number means Integrated Services Digital Network (ISDN) and on this point I am in error…I mistook it for the ISP access number whose Entry appears Higher in the Edit List. I am afraid I misread while researching your problem. You don’t need to worry Inserting a Specific Telephone number where it is concerned. My apologies.
I understand what your problem is but I do not understand why you are not seeing a Gedit Document. Also, you will never Conf(Configuration) Make Changes in Terminal.
You don’t need to use the Insert Key to add/delete Conf Edits. It is simply cut and paste or typing simple things such as User Name and the Password.
Let’s try it this way.
Open Terminal and type: sudo gedit /etc/wvdial.conf
Give PW-Press Enter
At this point a Gedit Document should open. If you don’t see it. Try Minimizing the Terminal Window. It could be hidden behind it.
If opens properly you should see the following:
[Dialer Defaults]
Phone=
Username=
Password=
New PPPPD= yes
If this Happens Delete Everything and Paste the Gedit Instructions bewlow:
[Dialer Defaults]
Init1 = ATZ
Init2 = ATQ0 V1 E1 S0=0 &C1 &D2 +FCLASS=0
Modem Type = Analog Modem
Phone = #777
Username = Your phone number
Password = Your phone number or password if any
ISDN = 0
SetVolume = 0
FlowControl = Hardware (CRTSCTS)
Modem = /dev/ttyUSB0
Dial Command = ATDT
Baud = 460800
Stupid Mode = 1
Then Save File. Close and attmept to dial out
sudo wvdial
I understand your frustration. I have had my share of hassle getting things to work from to time. This is simply a matter of overlooking something.
Good Luck.
hi ice,
this is what happens>>>>
jeevak@jeevak-Inspiron-N5010:~$ sudo gedit /etc/wvdial.conf
[sudo] password for jeevak:
jeevak@jeevak-Inspiron-N5010:~$ sudo wvdial
–> WvDial: Internet dialer version 1.60
–> Cannot open /dev/ttyUSB0: No such file or directory
–> Cannot open /dev/ttyUSB0: No such file or directory
–> Cannot open /dev/ttyUSB0: No such file or directory
jeevak@jeevak-Inspiron-N5010:~$ sudo gedit /etc/wvdial.conf
jeevak@jeevak-Inspiron-N5010:~$ sudo wvdial
–> WvDial: Internet dialer version 1.60
–> Cannot get information for serial port.
–> Initializing modem.
–> Sending: ATZ
OK
–> Sending: ATQ0 V1 E1 S0=0 &C1 &D2 +FCLASS=0
ATQ0 V1 E1 S0=0 &C1 &D2 +FCLASS=0
ERROR
–> Bad init string.
–> Cannot get information for serial port.
–> Initializing modem.
–> Sending: ATZ
OK
–> Sending: ATQ0 V1 E1 S0=0 &C1 &D2 +FCLASS=0
ATQ0 V1 E1 S0=0 &C1 &D2 +FCLASS=0
ERROR
–> Bad init string.
–> Cannot get information for serial port.
–> Initializing modem.
–> Sending: ATZ
ATZ
OK
–> Sending: ATQ0 V1 E1 S0=0 &C1 &D2 +FCLASS=0
ATQ0 V1 E1 S0=0 &C1 &D2 +FCLASS=0
ERROR
–> Bad init string.
i had a look at one of the sites u sent me. in that they have done away with “amp” and “;” in this line “ATQ0 V1 E1 S0=0 &C1 &D2 +FCLASS=0”
i’m a bit bald to begin with…at the end of this i’m gonna look like yul brenner!!!!!
after i remove amp and ; this is what i see on sudo wvdial
jeevak@jeevak-Inspiron-N5010:~$ sudo wvdial
–> WvDial: Internet dialer version 1.60
–> Cannot get information for serial port.
–> Initializing modem.
–> Sending: ATZ
ATZ
OK
–> Sending: ATQ0 V1 E1 S0=0 &C1 &D2 +FCLASS=0
ATQ0 V1 E1 S0=0 &C1 &D2 +FCLASS=0
OK
–> Modem initialized.
–> Sending: ATDT#777
–> Waiting for carrier.
ATDT#777
CONNECT
–> Carrier detected. Starting PPP immediately.
–> Starting pppd at Sun Apr 17 07:37:14 2011
–> Pid of pppd: 2885
–> Using interface ppp0
–> pppd: (?Z @?Z
–> pppd: (?Z @?Z
–> pppd: (?Z @?Z
–> pppd: (?Z @?Z
–> Disconnecting at Sun Apr 17 07:37:15 2011
–> The PPP daemon has died: Authenticatio
Yul Brenner was One Tough Hombre(Man) or rather robot in “Westworld”–so maybe looking him would not be a bad thing.. 😉
Ok. It looks we are on the right track…When you copied the Edit Info….did you include your Personal Information?
I mean in this section:
Init1 = ATZ
Init2 = ATQ0 V1 E1 S0=0 &C1 &D2 +FCLASS=0
Modem Type = Analog Modem
Phone = #777
Username =
Password =
If not try again. If that fails. I will research the Error prompts more thoroughly.
hey ice,
it still doesnt work.
this is what ive typed. word to word
[Dialer Defaults]
Init1 = ATZ
Init2 = ATQ0 V1 E1 S0=0 &C1 &D2 +FCLASS=0
Modem Type = Analog Modem
Phone = #777
Username = 9379977836
Password = 9379977836
ISDN = 0
SetVolume = 0
FlowControl = Hardware (CRTSCTS)
Modem = /dev/ttyUSB0
Dial Command = ATDT
Baud = 460800
Stupid Mode = 1
this is what i get
jeevak@jeevak-Inspiron-N5010:~$ sudo wvdial
–> WvDial: Internet dialer version 1.60
–> Cannot get information for serial port.
–> Initializing modem.
–> Sending: ATZ
ATZ
OK
–> Sending: ATQ0 V1 E1 S0=0 &C1 &D2 +FCLASS=0
ATQ0 V1 E1 S0=0 &C1 &D2 +FCLASS=0
OK
–> Modem initialized.
–> Sending: ATDT#777
–> Waiting for carrier.
ATDT#777
CONNECT
–> Carrier detected. Starting PPP immediately.
–> Starting pppd at Sun Apr 17 09:42:38 2011
–> Pid of pppd: 2153
–> Using interface ppp0
–> pppd: (?~ @?~
–> pppd: (?~ @?~
–> pppd: (?~ @?~
–> pppd: (?~ @?~
–> Disconnecting at Sun Apr 17 09:42:38 2011
–> The PPP daemon has died: Authentication error.
–> We failed to authenticate ourselves to the peer.
–> Maybe bad account or password? (exit code = 19)
–> man pppd explains pppd error codes in more detail.
–> I guess that’s it for now, exiting
–> The PPP daemon has died. (exit code = 19)
Hey Jeevak,
Try adding 3 simple letters: z t e
[Dialer Defaults zte ]
Init1 = ATZ
Init2 = ATQ0 V1 E1 S0=0 &C1 &D2 +FCLASS=0
Modem Type = Analog Modem
Phone = #777
Username = Your phone number
Password = Your phone number or password if any
ISDN = 0
SetVolume = 0
FlowControl = Hardware (CRTSCTS)
Modem = /dev/ttyUSB0
Dial Command = ATDT
Baud = 460800
Stupid Mode = 1
no luck
jeevak@jeevak-Inspiron-N5010:~$ sudo wvdial
–> WvDial: Internet dialer version 1.60
–> Warning: section [Dialer Defaults] does not exist in wvdial.conf.
–> Cannot open /dev/modem: No such file or directory
–> Cannot open /dev/modem: No such file or directory
–> Cannot open /dev/modem: No such file or directory