Step By Step Ubuntu 19.10 (Eoan Ermine) LAMP Server Setup
Sponsored Link
You can download the Ubuntu server from here and this installation is based on live server image.
Ubuntu 19.10 LAMP server Install the following Versions
Ubuntu 19.10 (Eoan Ermine)
Apache 2.4.41
Mysql 8.0.19
PHP 7.3.11
After booting into the installer, it will ask you which language to use.

Installer requests update if they have any new version


Next, the installation process begins by asking for your keyboard layout. You can ask the installer to attempt auto-detecting it, or you can select it manually from a list.

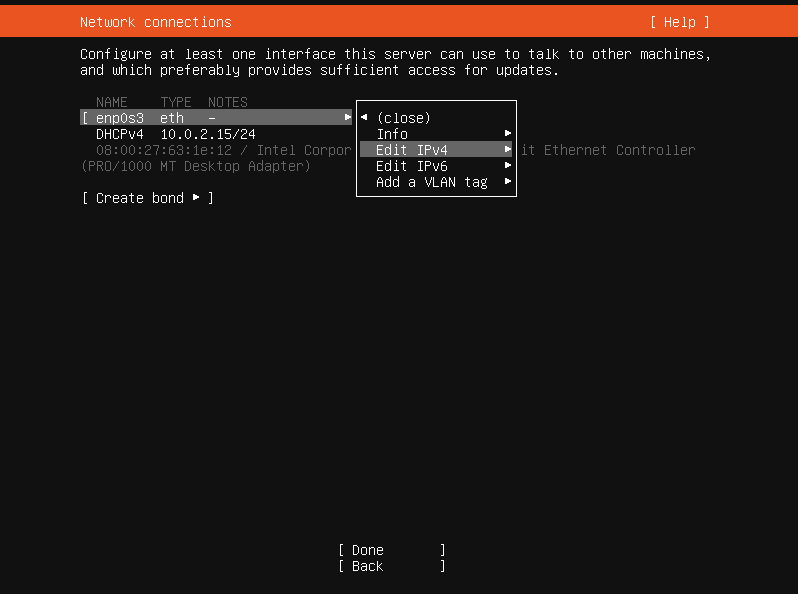
The installer configures the network to run DHCP on each network interface. If this is not sufficient to get access to the internet you should configure at least one interface manually. Select an interface to configure it.

If the Ubuntu archive can only be accessed via a proxy in your environment, it can be entered on the this screen. Leave the field blank if it is not required.

You can then choose to let the installer use an entire disk or configure the partitioning manually. The first disk you create a partition on will be selected as the boot disk and have an extra partition created on it to contain the bootloader; you can move the boot partition to a different drive with the "Select as boot disk" button.


Create user and enter server name

Open SSH server installation option

If you want to install any featured snaps select here

Installation complete


After logging in to the server you should see similar to the following screen

Installing LAMP server Using Tasksel
Instead of installing Apache, MySQL, and PHP separately, Tasksel offers a convenient way to get a LAMP stack running quickly.
Install Tasksel if not already installed by default
sudo apt install tasksel
Use Tasksel to install the LAMP stack:
sudo tasksel install lamp-server
Optionally, install additional cURL, JSON, and CGI support:
sudo apt install php-curl php-json php-cgi
Configuring Static ip address in Ubuntu 19.10 server
Ubuntu installer has configured our system to get its network settings via DHCP, Now we will change that to a static IP address for this you need to edit
Edit /etc/netplan/01-netcfg.yaml and enter your ip address details (in this example setup I will use the IP address 192.168.56.10):
sudo nano /etc/netplan/01-netcfg.yaml
and enter the following save the file and exit (In vi, ESC, then ZZ to save and exit)
enp0s3:
dhcp4: no
dhcp6: no
addresses: [192.168.56.10/24]
gateway4: 192.168.56.1
nameservers:
addresses: [8.8.8.8,8.8.4.4]
Note:- enp0s3 is network interface name
Now you need to apply the config using netplan
sudo netplan apply
You need to setup manually DNS servers in resolv.conf file when you are not using DHCP.
sudo nano /etc/resolv.conf
You need to add look something like this
search domain.com
nameserver xxx.xxx.xxx.xxx

