
Sponsored Link
Most ISPs provide dial-up connections supporting PPP because it is a fast and efficient protocol for using TCP/IP over serial lines. PPP is designed for two-way networking; TCP/IP provides the transport protocol for data.
PPP (Point to Point Protocol) uses several components on your system. The first is a daemon called pppd, which controls the use of PPP. The second is a driver called the high-level data link control (HDLC), which controls the flow of information between two machines. A third component of PPP is a routine called chat that dials the other end of the connection for you when you want it to.
Configuring a Dial-Up Connection in Ubuntu
Ubuntu includes some useful utilities to get your dial-up connection up and running.Here is the following ways you can connect to your dialup connection
1)Using your networking option in Ubuntu
2)using gnome-ppp
3)using kppp (For Kubuntu)
4)using wvdialconf & wvdial
5)using pppconfig & pon/poff
first thing you need to make sure your modem drivers are installed or not.If you want more details about modem drivers in ubuntu and installation check here
Now we will see 3 ways how to configure dialup connection in ubuntu
Before Starting
Before configuring Dial-up connection you need to have the following information from your ISP
1)Username
2)Password
3)Dail-in number
Configuring a Dial-Up Connection using Networking option
you can go to System—>Administration —>Networking
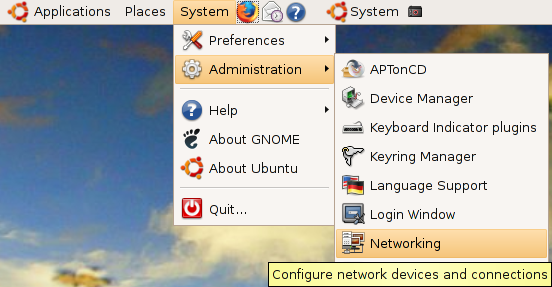
Once it open the application you should see the following screen

In the above screen select modem connection option and click on properties you should see the following screen

The first thing you will need to do is to enable the connection by ticking the Enable this connection box,now you need enter your ISP's phone number as well as your username and password

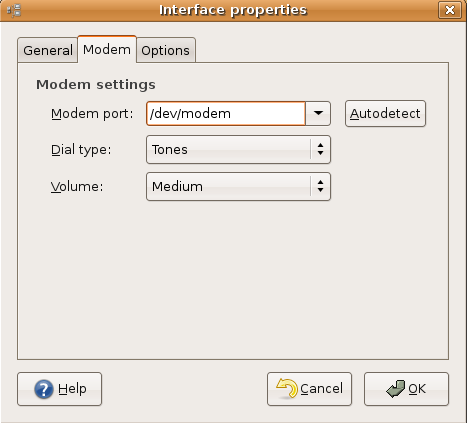
Next, click on the modem tab to specify details about your modem and also configure the speaker volume. Most telephone systems use tone dialling nowadays, so make sure this is selected . I have selected the speaker volume on medium.
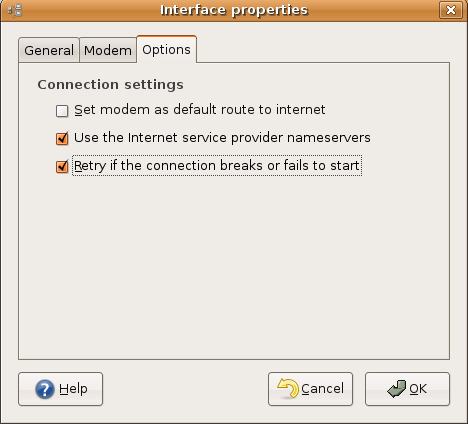
Now you need to click on options tab If you are using a laptop, then you will probably want to uncheck Set modem as default route to the Internet whilst you are on a LAN, otherwise you may struggle to see anything! Tick it when you are expecting to use your dial-up connection though, and Ubuntu will use this connection to get out onto the Internet.You need to select other two options checked.
Now You can use the Gnome Modem Monitor and Network Monitor panel if you want to stop, start and monitor modem connections.
Configuring a Dial-Up Connection using pppconfig
configure a connection using pppconfig, a command line utility to help you to configure specific dial-up connection settings.This is a command line based option to manage dialup connections.
Open a terminal from Applications > System Tools > Terminal and type
sudo pppconfig
Now you should see the following screen here you need to select "Create Create a connection" select ok and press enter

Here you need to enter provider name and you can leave default one and in this example i am giving "comcast" select ok and press enter

Next screen you need to select "Dynamic Use dynamic DNS" select ok and press enter

You need to select Authentication method here i am selecting "chat :Use chat for login/password :Authentication" select ok and press enter

Select login prompt option leave default select ok and press enter

Select password prompt option leave default select ok and press enter

Enter the username given to you by your ISP in this example i am using "ruchiw" select ok and press enter

Enter the password given to you by your ISP in this example i am using "myfirstpassword" select ok and press enter

Enter the modem speed as "115200" select ok and press enter

Select method of dialing as "Tone" select ok and press enter

Enter the number to dial select ok and press enter

Choose your modem configuration method if you want to detect your modem automatically select yes otherwise select no in this example i am selecting no select ok and press enter

Select the modem port and i leave the default option select ok and press enter

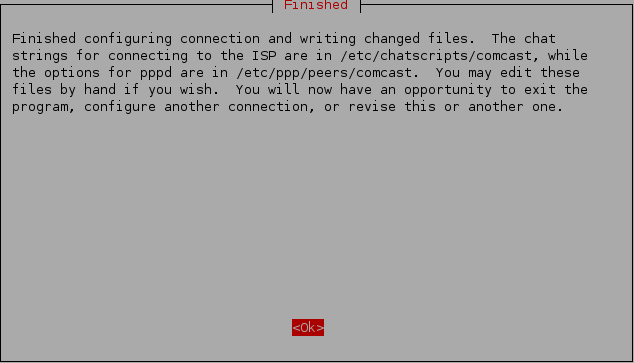
Here is the complete details you have choosen for your provider connection in this example comcast

Finished the connection settings select ok and press enter
Select "Quit Exit this utility"
Exit the terminal window using the following command
exit
Connecting to your ISP
Before you connect for the first time you need to add yourself to both the dip and dialout groups by using the commands
sudo adduser YOURNAMEHERE dip
sudo adduser YOURNAMEHERE dialout
# connect to the ISP configured as "comcast"
pon comcast
# disconnect the ISP configured as "comcast"
poff comcast
If you are trying to connect as default "provider" you need to use the following commands to connect and disconnect
pon
poff
You can check the last messages generated by these commands with
# shows the (status) messages generated by pon and poff
plog
Configuring a Dial-Up Connection using gnome-ppp
GNOME PPP is an easy to use graphical dialup connection configuring and dialing tool with system tray icon support.It uses GNOME/GTK+ for its graphical interface and integrates well in GNOME desktop environment, but it can be used in other environments.
It also uses WvDial dialer as its backend, providing simple configuration via config files. You can also use plain wvdial if you don't have X running.
Install gnome-ppp Ubuntu
sudo apt-get install gnome-ppp
This will complete the installation.
If you want to open the application go to Application--->Internet--->GNOME PPP

Once application opens you should see the following screen

In the above screen you need to click on setup to configure your settings you should see the following screen configre the modem settings

Next click on networking tab to configure network settings

Next click on options tab to configure general options

Once you have all the details enter the details you can see the following screen

dear ice warrior,
i got it to work!!!!!!!!!!
thank u so much!!!!!!!!!
please dont ask me what i had done wrong. its way too embarrassing to post on this wall….
but it works now.
thanks again
you are a true ninja ice warrior!!!!
Jeevak the dunce
Hello Jeevak,
Congratulations! 😀 Jeevak the Scholar. 😉 Don’t beat yourself up. Everyone has experienced such moments but most importantly you got your setup to work, gained Command Line experience and Learned new computer skills. 😉
You are welcome. I am glad I could help. Enjoy your Ubuntu Box. 😀 Best Wishes. 🙂
IW the Ninja 😀
hey ice!!
i’m back again with new set of problems on a new system. just installed the 11.04 on a HP mini 2133.
problem
#1 the system freezes when u try to connect to the net using the wireless
#2 tried installing wvdial on it and….here’s whats happening
opened terminal
typed “sudo apt-get install wvdial
it downloads it
then typed sudo gedit /edit/wvdial.conf
a blank screen opens up
enter the data which u had sent me which i used on my other system which works
and it says”cannot find the file /edit/wvdial.conf”
please help!!!
Hey Jeevak, 🙂
It’s good to hear from you again. I am sorry that it’s due to more problems but no worries; let’s see if we can get things back on track. 😉
I will start in inverse order–Problem #2 first. I think this problem may be solved with a simple text correction. Try typing the command as follows:
sudo gedit /etc/wvdial.conf/
A semi-blank Gedit document should open ready to accept your account info then carry on as before.
Problem #1. May be a case of the “Broadcom” Drivers( they control your wireless card) not being recognized and that is easy to fix.
A. Fully shutdown your HP mini 2133 then turn it back on. Pay attention to its LEDs and notice if the LED for the Wireless card is either flashing or Lit without flashing. If it is flashing that means the card is active and trying to connect. If it is Lit then it is connected. If it is not lit then Ubtuntu is not driving the card and in your case that may be why the System freezes when trying to connect.
B. Solution: Go to System> Administration> Synaptic Package Manager> Enter PW> Quick Search
C. Type “Broadcom” in the Quick Search Panel and wait about 2 seconds. You should see the following:
bcmwl-kernel source
bcm5700-source
broadcom-sta-common
broadcom-sta-source
bcmwl-modaliases
b43-fwcutter
Click on each category and a brief explanation will appear to help you decide which specific package works best on your computer. Based on past experience of all shown–“b43-fwcutter’ was absolutely required(at least on my Compaq V5000 laptop). You can experiment by selecting the Broadcom think may work–if it does not–uninstall and try another until you find the drivers compatible with your machine.
D. When Ubuntu has finished making the selected changes. RESTART the computer( it will not work if you fail to restart)and your 11.04 wireless connection should work correctly from that point forward.
I did this operation in 9,04, 9.10 and 10.04. It was much more difficult in 9.04 and 9.10 because those version did not have Broadcom packages in Synaptic. 10.04 made it much easier. So I imagine 11.04 should be as easy or easier. I will shortly install 11.04 to a test machine and will be able assist you better with future questions. 😉
Good Luck Jeevak! 😀
thats great
how i can remove my password in ubuntu 9.1
have problem after added user dfip and dialout
when use pon comcast I get error that only member of dip can use it.
What should I do?
Thanks
Hello Paul,
I apologize for the delay in answering your question. Unfortunately, even Mighty Ubuntu/Linux can sometimes be at the mercy of a component’s hardware failure. ;-}
But let’s try to get you and running…
Using your settings as you have already configured; try a simple sudo command(in Terminal):
“sudo pon”
without the quotation marks and see if this connects. If not check your settings and if necessary reconfigure your setup using the following:
$ sudo adduser USERNAME dip
$ sudo adduser USERNAME dialout
Make certain you use your Specific Username
“You will also need to know the device node of your modem. The “Installing the driver”-section of this page should have told you about it. In case you don’t know it, assume /dev/modem. ”
https://help.ubuntu.com/community/DialupModemHowto/SetUpDialer
If that does not work; let me know and we’ll try another tack.
Good Luck.
Thanks Ice Warrior
It looks like I have some problem with dialup modem itself.
Hello Ice Warrior:
I am looking for Slmodemd_gcc4.4_alsal1.0.23.tar.gz
in smartling is only one with alsal1.0.21.tar.gz
My Modem data recomend 0.23 where I can ged it and what is the difference?
Thanks
Hey Paul,
Glad to see you’re still out and about. 🙂 Let’s see if we can get your current situation sorted.
I am answering your question in Inverse Order. I dug around and the location, I found, that is most likely to have the files you need can be found in the link below:
http://linmodems.technion.ac.il/packages/smartlink/
The match will have to be Compatible as opposed to Exact because I had the same problem as you. I could not find a source with “0.23” suffix in the file name.
SLmodem means: Smart Link Soft Modem for Linux and in the simplest terms you need this kind of driver because the “Winmodems” in laptops generally will not work with Linux. You can read more about this in the link below:
http://geni.ath.cx/slmodem.html
In the your specific case–It may be that 0.23 has certain proprietary drivers( updated) included in the package to allow it run on Linux. I encountered a similar situation making Karmin 9.10 work with Windows Wireless Drivers in order to connect to WiFi. I had to use Broadcom files from a Fedora Site and in the end it worked very well. In any case in the previous link, I think this version may work for you:
” slmodem-2.9.11-20110321.tar.gz 14-Apr-2011 06:53 1.0M ”
My thinking is: using a slightly different but compatible package for the Slmodem will be similarly successful. Keep in mind at the end of the day all you need are driver files that work even if they are not 100% match.
Of course, I’ll keep digging on this end and see if I can come locate more precise information. In the meantime Good Luck.
Thank you Ice Warrior.
I am totaly new to Linux.
I get so far as to command (/usr/sbin/slmodemd –country=CANADA /dev/slamr0) after that I get:
SmartLink Soft Modem: Version 2.9.11 (date of creation)
Symbolic link `/dev/ttyDL0′ -> `/dev/pts/1′ created
Modem `Slamer0 created. TTY is `/dev/pts/1′
Use `/dev/ttySL0 as modem device, Ctrl+C for termination.
Then there is no command line at all.
At that moment I try to search for modem under GnomePPP and get message NO MOdem was found on your System.
Thanks for help
Hey Paul,
I completely understand 😉 I was once completely new to Linux and I know the feeling. Anyway, you are very welcome.
I am going to dig a little more into this. I might not post for a couple of days. It depends on just how much digging I have to do…
I have come across a technique to get tar. z files to install in Ubuntu because that can sometimes be a hassle.
Back soon. 😉
Thanks Ice.
No rush at all. By the way I my modem is HSP 56 MR (SIS)
Thanks again
In Ubuntu 11.04 you can install Gnome-ppp from the add software button under applications, but there are several other things to do. Under the admin tab find users and edit both user and group privileges. I gave the user almost all privileges including modem. I gave group DIP access and probably a few others. I also had to give permission for DIP to access the PAP and CHAP secrets in ETC/PPP using gksudo gedit (right click use group drop down and find DIP) give them read and write. Additionally I had to gksudo edit $HOME/.wvdial.conf to change check carrier to off and stupid mode to on. Then I opened gnome-ppp hit the set-up button and detect. Closed that screen and entered username, password and number, but then I had to gksudo Gnome-ppp to connect one time. — These directions are not the best but they will save you days of internet searching for solutions and give you hints at where to look. Good luck. Perhaps someone can do an install and rewrite with the actual step by step instructions. I’m exhausted after 3 days of a steep learning curve and no complete set of instructions anywhere (each step got me closer, but the final step that got me online came from a website in New Zealand. Way to go down under!).
Hello Paul,
Sorry this is so late. I had trouble getting the answer to post. Try this:
Go to Administration > Hardware Drivers > Wait a moment as Ubuntu scans your system. A window will appear that will display available or installed drivers. The drivers you need should be shown in the list. Highlight and click the “Activate” button. The drivers should start to function without further input from you.
I know that is a rather abbreviated answer but as I said at the start. I had a lot of difficulty getting the answer to post.
Good Luck.
Hi Ice.
I try but get message:”Downloading package indexes failed, please check your network status”
then new window says: Most drivers will not be availaible.
after search :” No proprietory drivers are in use on this system.”
I try to reload slmodem but get error 1 and error 2 running make install.
Thanks.
Paul
Hey Paul,
I understand the problem. Before, when I tried posting I had included a couple of links to the Drivers you need but for some reason. This platform would not permit them to post.
I’ll try again..You need specific drivers. I believe that you can find them at the link below:
http://list.driverguide.com/list/company471/page2/
After downloading them. You will have to make your System “See” them. Attempt with the following steps:
#1. Make a folder for the downloaded drivers. Place the entire zip file within this folder.
#2. Extract the zip files from the archive. Extract to Documents. The files will appear as Windows icons.
Finally repeat> Go to Administration > Hardware Drivers
Since you will have manually placed the needed drivers within Documents. You should now be able to run the modem.
Good Luck with this newest attempt.
Hi Ice.
HAve no luck. went to your link but find only Windows driver. Changed search to Linux. There were two availaible for my HSP card. Tried but no wake up. Same message. When I look at files of driver who supposed to be for Linux find out there are Microsoft orientated files.
Thanks anyway. I find out my modem is made in China and no manufacture is mentioned, so I think i will have to look for more frendly card.
Sorry to take your time.
Paul
Ray, You Said:
I also had to give permission for DIP to access the PAP and CHAP secrets in ETC/PPP using gksudo gedit (right click use group drop down and find DIP) give them read and write.
===========
What file did you edit (gksudo gedit ) ? You lost me here. What did you right click on? What application are you in here? The file manager (thunar)? When I try this the permissions are greyed out. I guess you have to be root to do this. But how do you get root access in thunar?
I’ve set permissions on those files in a terminal window using chmod but they get reset when I boot the computer. How do you make these permissions survive a reboot?
This is valuable info. GNOME-PPP is broken and has been for a long time. Strange how it never gets fixed.
Is there a way to make my ppp dial a different number automatically if the first number fails?
i got connected with mobile broadband but when i am trying to fire sudo apt get update something wicket happened is the answer please if anyone can help
GNOME-PPP was died. Now it’s GTK-PPP: https://sourceforge.net/p/gtk-ppp/