
Sponsored Link
Before Upgrading You need to remember the following point
Take comple backup of your system before upgrading .Now you need to upgraded Ubuntu Edgy Machine to Ubuntu Feisty.
We can Use Two methods to upgrade Ubuntu Edgy to Ubuntu Feisty
1) Using GUI
2) Using apt-get
Upgrading Ubuntu Edgy to Ubuntu Feisty
Method 1 -- Using GUI
If you want to upgrade using GUI use the following command
gksu “update-manager -c ”
“-c” switch tells it to look for upgrades at all.
You should see the following screen here Now you can see 7.04 is available for upgrade click on upgrade

Now you should see the release notes as follows here you need to click on upgrade

Once you click on upgrade you might get the error "Authentication failed"

You need to fix the above error for this open the terminal and type the "gpg" and press enter once you see the following message
gpg:Go ahead and type your message ...

Press Ctrl+C and then start the install process again.
Now you should see the following screen downloading upgrade tool

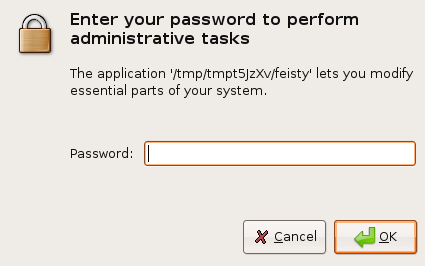
You need to enter root password and click ok
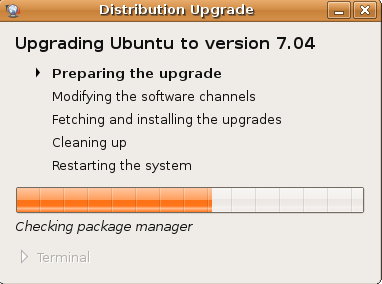
Preparing the upgrade in progress
You need to confirm the upgrade process by clicking "Start Upgrade"

Download in progress for all the required packages for Upgrade

Installation in progress

If you click on Terminal to see detailed installation in progress

Cleaning Up is in Progress

You need to restart the system to complete the Upgrade by clicking "Restart Now"
Method 2 -- Using apt-get
Edit your /etc/apt/sources.list as root. Change every occurrence of edgy to feisty.
Use any prefered editor. If you have a CD-ROM line in your file, then remove it.
sudo vi /etc/apt/sources.list
or
use the following Simple command
sudo sed -e ’s/\edgy/ feisty/g’ -i /etc/apt/sources.list
Now you need to update the source list using the following command
sudo apt-get update
Upgrade using the following command
sudo apt-get dist-upgrade
Double check your process was finished properly using the following commd
sudo apt-get -f install
sudo dpkg --configure -a
Now you need to Reboot your machine to take your new ubuntu 7.04 installation to effect all changes.
Testing Your Upgrade
You can check the ubuntu version installed using the following command
sudo lsb_release -a
Output Looks like below
Distributor ID: Ubuntu
Description: Ubuntu feisty (development branch)
Release: 7.04
Codename: feisty
or
Just type the following command in your terminal
cat /etc/issue
Output Lokks like below
Ubuntu feisty (development branch) \n \l
i get this what is wrong?
sudo sed -e ’s/\edgy/ feisty/g’ -i /etc/apt/sources.list
sed: -e expression #1, char 1: unknown command: `
please correct me if I did something wrong
try to use this and check
sudo sed -e ‘s/\sedgy/ feisty/g’ -i /etc/apt/sources.list
same thing i just did:
sudo gedit /etc/apt/sources.list
and then used the replace function to look for edgy and replace with feisty so now it should work
thanks not sure why the sed is not working
sed command doesn’t work for me either. find/replace works fine.
what about upgrades using the alternate CDs? it should be another method to upgrading.
this:
——————————————————-
If you want to upgrade using GUI use the following command
gksu “update-manager -c ”
———————————————————-
did not work at all…
jwb@jwb-laptop:~$ gksu “update-manager -c ”
gksu: invalid option — c
GKsu version 1.9.3
Usage: gksu [-u ] [options]
jwb@jwb-laptop:~$ cat /etc/issue
Ubuntu 6.10 \n \l
try to use gksudo “update-manager -c “
Is there a problem with automatix or a way to get around the following fatal error?
http://www.getautomatix.com/apt/dists/edgy/main/binary-i386/Packages.bz2: Sub-process bzip2 returned an error code (2)
The installer keeps bombing with complaints ranging from potential network problems to protests that bzip2 is not a bzip2 file.
For the people who can’t get sed to work, the problem is that you can’t just copy and paste from this page. It uses the wrong quote mark. The best way to get this to work (which worked for me) is to copy the command above, paste it into your terminal, and then replace the quote marks in the command with a single quote from your keyboard.
I Also get the following.
kjames@fluffybunny:~$ gksudo “update-manager -c “
gksudo: invalid option — c
I did a direct cut and paste from the webpage. Is there something that needs to be installed first?
OOPS. I typed mine in before reading the comment about the quotes. That fixed it for me.
My attempt to upgrade, whether using the GUI of command line, freezes on the following.
Err http://packages.freecontrib.org dapper Release.gpg
Could not connect to packages.freecontrib.org:80 (88.191.33.6), connection timed out
Correction: After about 6 connection timeouts, which takes quite some time, the command line upgrade does seem to continue. Whether it’s all OK or not, time will tell.
After install finished all the text on the screen…and everywhere else except in terminal window is a rectangular “0” or “O”. How can I fix this? During download there were a number of programs that did not finish properly…server timed out or temporarily dropped the connection. I must be missing some necessary component.
Command line method should work, but prefer using aptitude instead of apt-get (same syntax). Aptitude handles dependencies better than apt-get.
On my installation I have Apache 2 + php 5, upgrading to apache 2.2 broke my php5 install (apache 2.2 doesn’t restart with 2.0 modules) with apt-get, and also broke the dist-upgrade process.
So tell configurator not to restart apache, or use aptitude.
Benoit
Thanks, finally got updated. Tried the ‘official’ way and it hosed @ 891 files. This finished it up nicely. Again, a great big THANKS!
Once I got past automatix (figure out where to remove it from the sources list) the upgrade went through like clockwork.
Recompiled Nvidia and everything is nice.
VMWare is a little fussy in the aftermath. Updated with the latest bleeding edge patch and networking had to be kludged with NAT but that appears to be the biggest problem.. pretty minor IMO.
This is a Dell 820 Laptop. Nice work guys.
Hi all, i have a little problem with my java version, i heard the java version is supposed to be the latest java version on Ubuntu 7.04 but i checked after the upgrade(from 6.10 to 7.04) and the java version is still 1.4.2(default system-wide java version on 6.10). How can i upgrade the java version and how can i make it replace the native java version(so it will be a system-wide java instead of a local java) I need to know to make frostwire works properly.
Tx in advance for your replies.
You need to install the latest java packages try this
Already tried it and still the same thing, the newly installed java isnt usable and when i type “java -version” in terminal i still get the same thing telling me the java version is 1.4.2.
one more option is remove java completely both the versions and install the latest version
I’ll try that tx. Lets cross our finguers and wish it will work.
GREAT It works !!! Tx for your help i realy apreciate it 🙂
Heres my problem, I’ve install ubuntu ultimate edition base on edgy eft 6.10 and want to upgrade to 7.04 with a cd but I want to keep the interface of ultimate edition. How would I go by doing this????
How to upgrade using the Ubuntu 7.04 Feisty Fawn CD?
sudo apt-cdrom add
sudo aptitude dist-upgrade
is that all? Do I have to replace every occurrence of edgy to feisty as said in Method 2?
follow this procedure if you want to upgrade ubuntu edgy using cdrom
make sure you have the alternate install CD, you can save bandwidth by loading the CD into your CD-ROM drive and using
sudo apt-cdrom add
Perform the upgrade
sudo apt-get update
sudo apt-get upgrade
sudo apt-get dist-upgrade
Just to be totally sure that everything is installed properly, run these commands
sudo apt-get update
sudo apt-get dist-upgrade
sudo apt-get -f install
sudo dpkg --configure -aRunning dist-upgrade again is done to ensure that no packages are left to install or upgrade. In some cases, certain packages fail to install even after running dist-upgrade the second time.
Reboot in order to effect all changes.
I upgraded using last method (from CD) and all is perfectly working. Thanks.
I tried the last 2 methods – both without success.
For method in (27) above, only the
sudo apt-cdrom addread the cdrom (and unmounted it immediately).
None of the other commands accessed the cdrom.
The “dist-upgrade” did just this:
Reading package lists... Done

Building dependency tree

Reading state information... Done

Calculating upgrade... Done

The following packages have been kept back:

  libc6-dev

0 upgraded, 0 newly installed, 0 to remove and 1 not upgraded.
The whole process was over in about a minute…
What might I be doing wrong?
Thanks for any help.
Oops where did that last post “30” go?
Anyways, trying again:
…continuing from post 29 …
I also tried replacing all instances of “edgy” with “feisty” in /etc/apt/sources.list.
I did list out 600+ upgrades, but it still isn’t reading from the cdrom. I tried this with the cdrom mounted, as well as unmounted (apt-cdrom had unmounted it). No luck. 🙁
hello
i’m trying to upgrade from 6.10 to 7.04, using gui, i got these errors
” Failed to fetch http://packages.freecontrib.org/ubuntu/plf/dists/edgy/free/binary-i386/Packages.gz 404 Not Found
Failed to fetch http://packages.freecontrib.org/ubuntu/plf/dists/edgy/non-free/binary-i386/Packages.gz 404 Not Found
Failed to fetch http://packages.freecontrib.org/plf/dists/dapper/free/binary-i386/Packages.gz 404 Not Found
Failed to fetch http://packages.freecontrib.org/plf/dists/dapper/non-free/binary-i386/Packages.gz 404 Not Found”
anyone can give me an advise about how to solve the problem?
thanks